If your router is running SMART/RG, this will be a direct how-to. If it is running some other software, which is likely, you’ll have to poke around to find how to do it on yours.
Many routers/firewalls (same thing!) have tiny little web servers in them that you can connect to with a computer connected to the LAN. The ip address and login name and password are often on a sticker on the router. One security strategy is to allow admin only on the wired LAN, so use an ethernet cable to connect your computer to the router. Enter the router’s ip address in Chrome or Firefox or whatever. It will look something like this: http://192.168.42.1/admin/ . (Aren't you glad you don't have to enter ip addresses? That's what DNS is for. It converts nice names like forums.trmn.org to numbers like 45.79.166.252 . But your computer has to have an ip address for its dns server!)
You may feel overwhelmed by the number of parameters and settings you can see just on the front page. If you see something like “WAN IPv4 Address”, write that down. This is what your Artemis friends will enter for the server ip address. If you see “Default Gateway” write that down. Mine’s eth4.1. That’s just the router’s name for the RJ-45 jack that the cable to the DSL or fiber box is plugged into. It may come in useful in a later step.
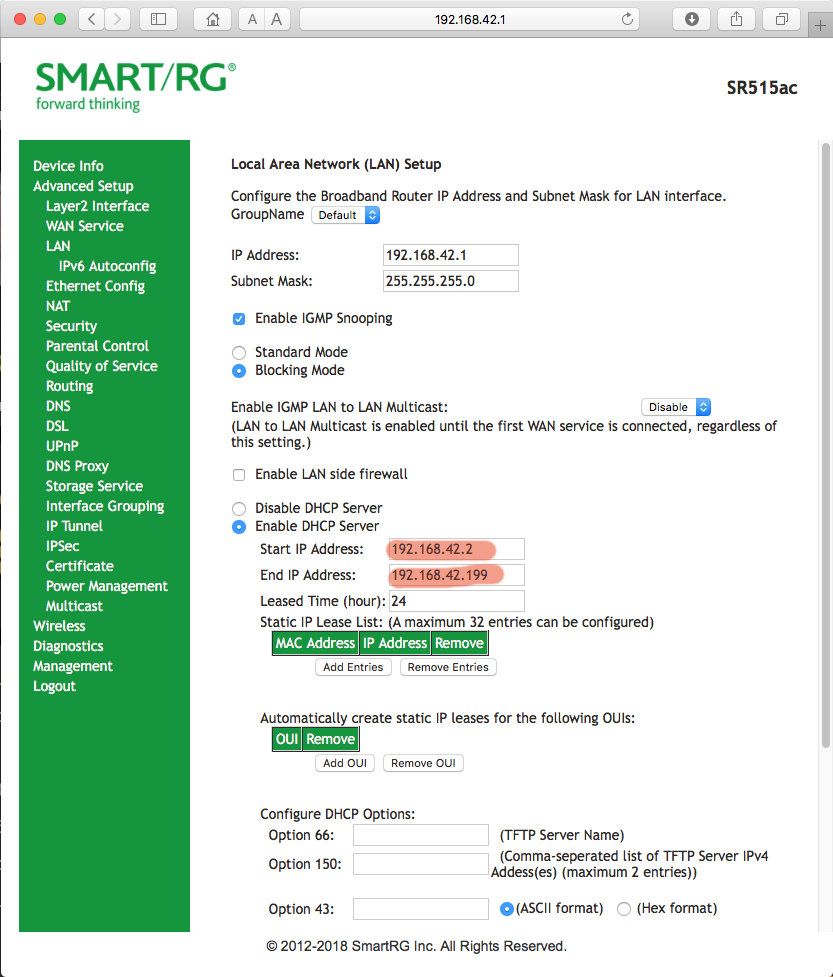
Every computer on a network has to have an ip address. DHCP is a system where a computer connecting to a network will say, “Hello? Can someone give me an IP address?” and the DHCP server will say, “Here you go. Use 192.168.42.86”. If you disconnect and reconnect some time later, you may get a different address. In any given network, some span of addresses is reserved for DHCP handouts and the rest are reserved for static (not changing) addresses. Your Artemis server will want a static address. On my router, DHCP settings are under LAN. Originally the End IP Address was 192.168.42.254. I changed it to 192.168.42.199.

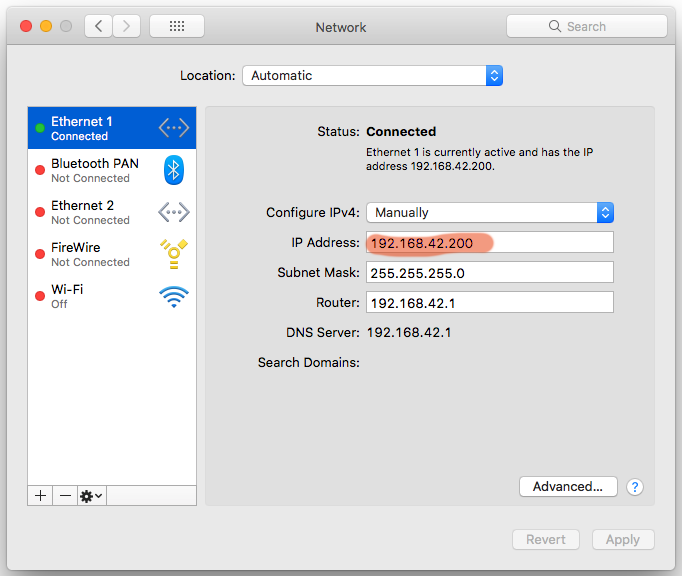
On my Mac Pro I set its network settings to “Configure iPV4 Manually” (instead of using DHCP) and I had to set its ip address to one not in the DHCP range:

Windows also has a setup for that. I don’t have a Windows computer, so no screen shots for you!
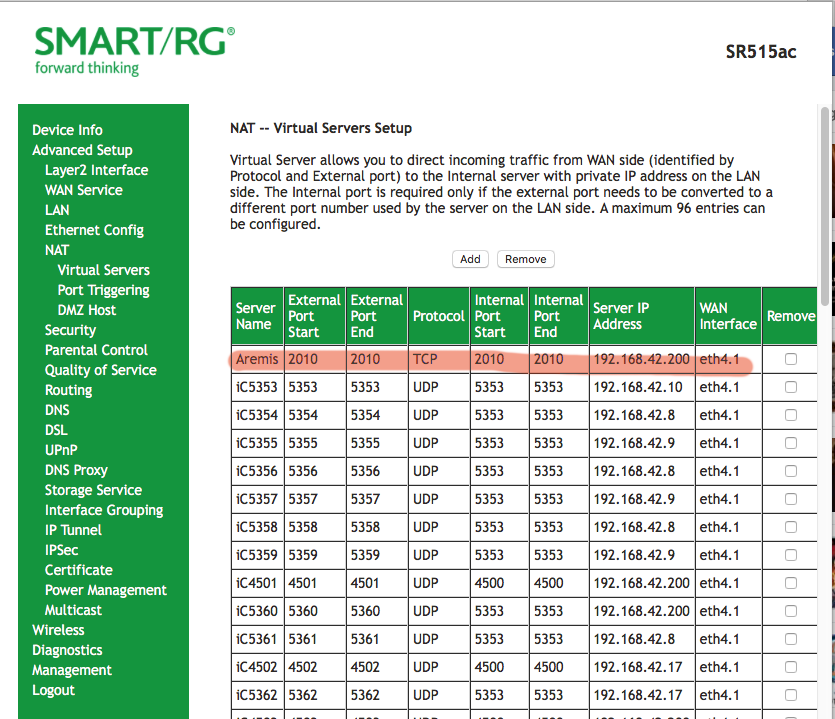
It's perfectly secure to reveal inside ip addresses like that. If the destination tag on a packet has a 192.168.*.* address, a router knows not to send that outside into the Big Bad Internet. NAT, or Network Address Translation, is the system your router uses to reroute packets from Google or Facebook or trmn.org to the correct computer on your inside network. How NAT works when you browse the web is a little off topic. But we need to tell NAT to route all packets on the Artemis port to your server. On my router, Idid that under Advanced Setup - NAT - Virtual Servers. Here I click Add.

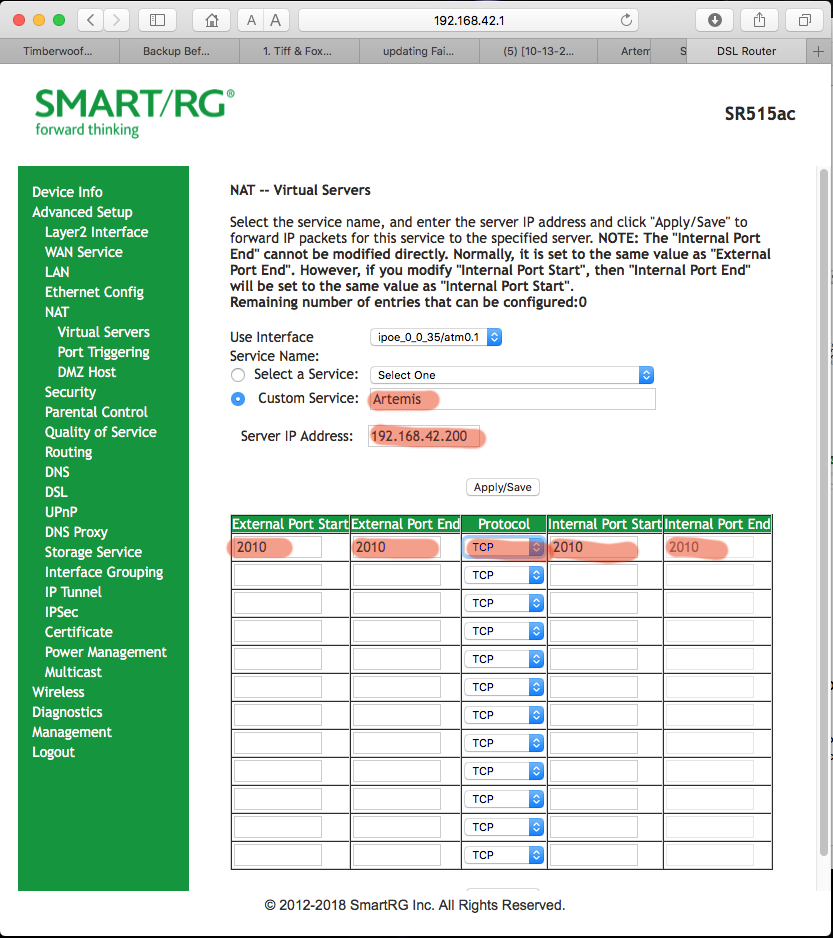
“Select a Servce” had a bunch of games already listed, but not Artemis, so I selected Custom Service, typed in “Artemis”, gave the server’s address, and filled in the port numbers. This setup allows for complicated servers with lots of ports. We just use port 2010 and the TCP protocol.

Click Apply and try it out. You can't test this from inside your network; you have to get someone on some other network to try it. It may take a little fooling around, so do this at least an hour before your first game.
Now I will inflict some nerd humor on you. There are two basic packet protocols on the Internet, UDP and TCP. I could tell you the UDP joke, but you might not get it. I could tell you the TCP joke, but I’d have to keep telling you the joke until you got it.
Many routers/firewalls (same thing!) have tiny little web servers in them that you can connect to with a computer connected to the LAN. The ip address and login name and password are often on a sticker on the router. One security strategy is to allow admin only on the wired LAN, so use an ethernet cable to connect your computer to the router. Enter the router’s ip address in Chrome or Firefox or whatever. It will look something like this: http://192.168.42.1/admin/ . (Aren't you glad you don't have to enter ip addresses? That's what DNS is for. It converts nice names like forums.trmn.org to numbers like 45.79.166.252 . But your computer has to have an ip address for its dns server!)
You may feel overwhelmed by the number of parameters and settings you can see just on the front page. If you see something like “WAN IPv4 Address”, write that down. This is what your Artemis friends will enter for the server ip address. If you see “Default Gateway” write that down. Mine’s eth4.1. That’s just the router’s name for the RJ-45 jack that the cable to the DSL or fiber box is plugged into. It may come in useful in a later step.
Every computer on a network has to have an ip address. DHCP is a system where a computer connecting to a network will say, “Hello? Can someone give me an IP address?” and the DHCP server will say, “Here you go. Use 192.168.42.86”. If you disconnect and reconnect some time later, you may get a different address. In any given network, some span of addresses is reserved for DHCP handouts and the rest are reserved for static (not changing) addresses. Your Artemis server will want a static address. On my router, DHCP settings are under LAN. Originally the End IP Address was 192.168.42.254. I changed it to 192.168.42.199.

On my Mac Pro I set its network settings to “Configure iPV4 Manually” (instead of using DHCP) and I had to set its ip address to one not in the DHCP range:

Windows also has a setup for that. I don’t have a Windows computer, so no screen shots for you!
It's perfectly secure to reveal inside ip addresses like that. If the destination tag on a packet has a 192.168.*.* address, a router knows not to send that outside into the Big Bad Internet. NAT, or Network Address Translation, is the system your router uses to reroute packets from Google or Facebook or trmn.org to the correct computer on your inside network. How NAT works when you browse the web is a little off topic. But we need to tell NAT to route all packets on the Artemis port to your server. On my router, Idid that under Advanced Setup - NAT - Virtual Servers. Here I click Add.

“Select a Servce” had a bunch of games already listed, but not Artemis, so I selected Custom Service, typed in “Artemis”, gave the server’s address, and filled in the port numbers. This setup allows for complicated servers with lots of ports. We just use port 2010 and the TCP protocol.

Click Apply and try it out. You can't test this from inside your network; you have to get someone on some other network to try it. It may take a little fooling around, so do this at least an hour before your first game.
Now I will inflict some nerd humor on you. There are two basic packet protocols on the Internet, UDP and TCP. I could tell you the UDP joke, but you might not get it. I could tell you the TCP joke, but I’d have to keep telling you the joke until you got it.
Jana Otahal liked this
Let's be about it!
Timber Lupindo, KDE, DGC, CGM, GS, RMN
Captain (JG); CO, HMS Medusa
GANA TSC Electronics Instructor
GANA TSC Flight Ops instructor
GANA TSC Chair, Astrogation and Communication
timberwooflupindo at gmail dot com
Timber Lupindo, KDE, DGC, CGM, GS, RMN
Captain (JG); CO, HMS Medusa
GANA TSC Electronics Instructor
GANA TSC Flight Ops instructor
GANA TSC Chair, Astrogation and Communication
timberwooflupindo at gmail dot com


